Custom placement
Custom placement lets you manually place wishlist buttons when automatic placement does not cover a specific theme layout.
When TValue adds support for a theme, we try to cover the important wishlist entry points across that theme, including common product pages, collection pages, featured products, featured collections, and other product sections where possible. Custom placement is mainly for special areas that may still be missed, such as custom sections, heavily modified themes, or unusual product layouts.
Use it only when you are comfortable inspecting theme HTML and choosing CSS selectors.
If you want wishlist buttons to appear in a special area such as a featured collection, featured product, custom section, custom theme layout, search result, recommendation block, or another theme-specific product area, contact us from the app and ask us to add support.
In most cases, it is better for TValue to add a theme preset than for merchants to maintain custom placement rules manually.
What custom placement can control
Custom placement is available for:
- Product listings: special collection layouts, search results, recommendation sections, featured collections, and other product listing areas.
- Main product: product pages, featured product sections, and product-like sections.
- Header button: custom header locations where automatic header placement does not work.
Standard product pages and main collection pages should usually use Auto show wishlist button first.
Before you start
Custom placement usually requires browser DevTools.
You need to identify selectors such as:
- Product item: the wrapper for one product card or the main product area.
- Product link: the link that points to the product page. This is usually needed for product listings.
- Inject target: the element where the wishlist button should be inserted.
- Button injection position or Icon injection position: where the button/icon should be inserted relative to the target.
Add a wishlist button to a product listing
Use this for product listing areas that are not covered by the standard Collection auto placement, such as search results, recommendation sections, featured collection sections, or custom product grids.
- Go to Display > Widgets > Auto show wishlist button > Custom placement.
- Click Add rule.
- On the storefront, open the product listing area.
- Right-click a product card, then click Inspect.
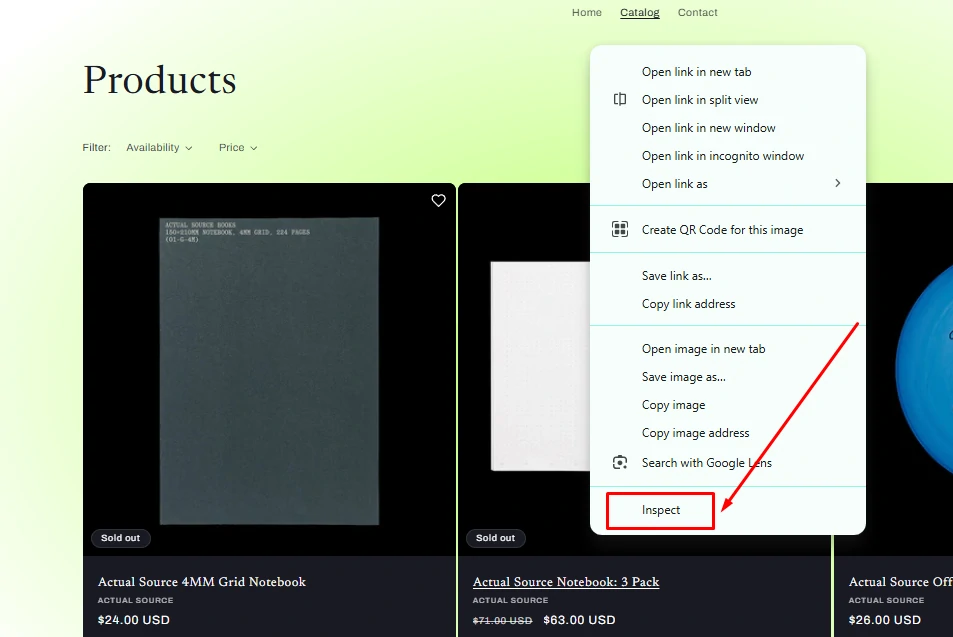
Inspect the product card where the wishlist button should appear.
- Find selectors for Product item, Product link, and Inject target.
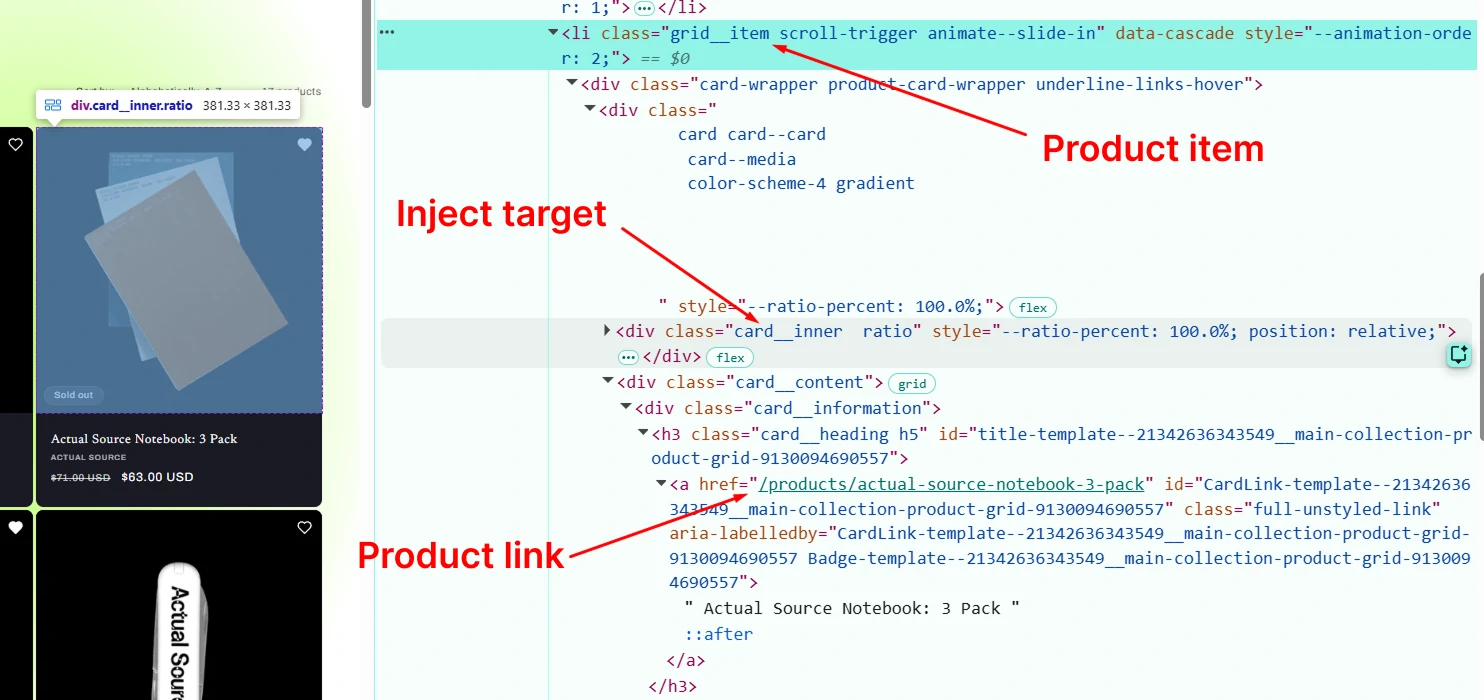
Product listing rules usually need a product item selector, product link selector, and inject target selector.
Example selectors:
Product item: .grid__item
Product link: .card__heading a
Inject target: .card__inner
- Under Apply to products, select Product listings.
- Choose a Button style.
- Choose a Button injection position.
- Save and test the storefront.
Add a wishlist button to a product page or featured product
Use this when automatic product page placement is not suitable, or when you need to place a wishlist button inside a featured product section.
- Go to Display > Widgets > Auto show wishlist button > Custom placement.
- Click Add rule.
- On the storefront, open the product page or product-like section.
- Right-click the product area, then click Inspect.
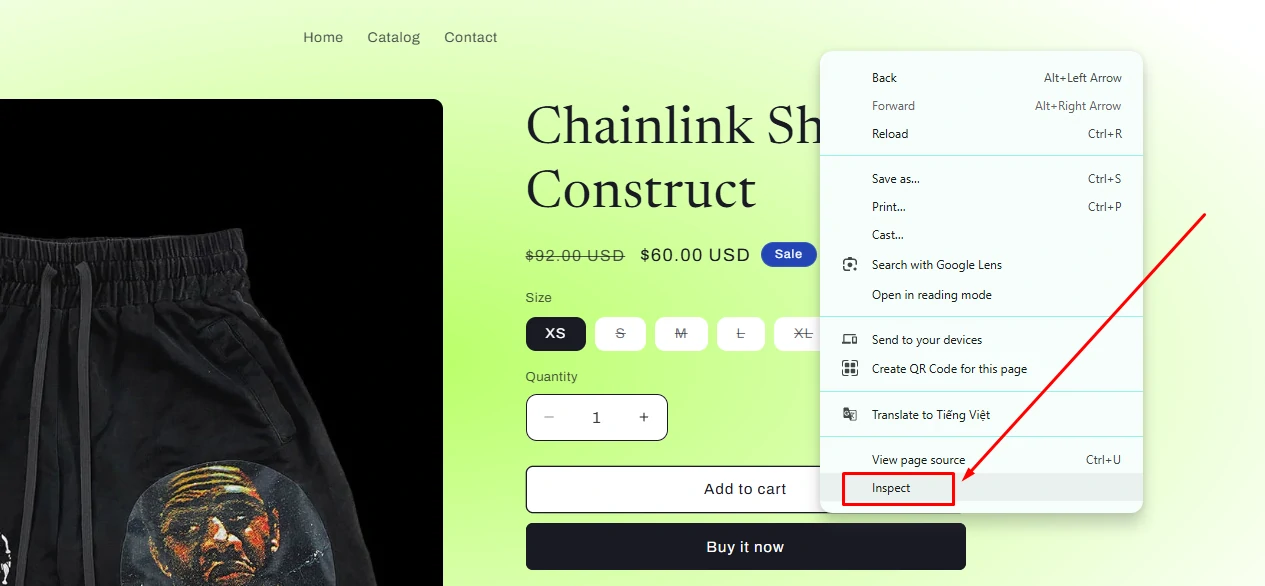
Inspect the product area where the wishlist button should appear.
- Find selectors for Product item and Inject target.
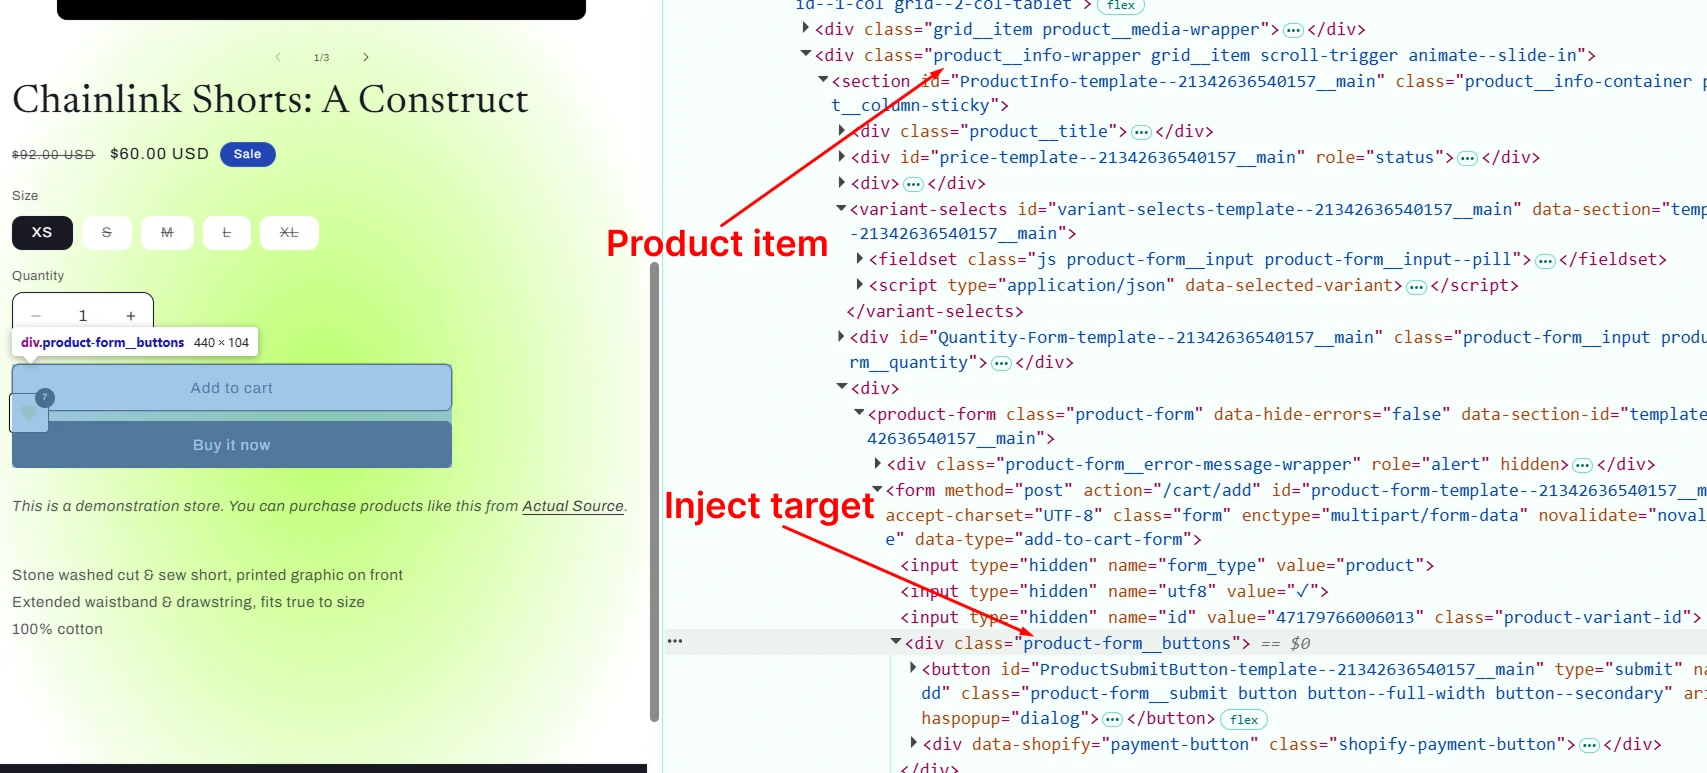
Main product rules usually need the product item selector and inject target selector.
Example selectors:
Product item: .product__info-wrapper
Product link:
Inject target: .product-form__buttons
- Under Apply to products, select Main product.
- Choose a Button style.
- Choose a Button injection position.
- Save and test the storefront.
Add a wishlist button to the header
Header custom placement is configured from the Wishlist header button settings, not from Auto show wishlist button.
- Go to Display > Widgets > Wishlist header button > Custom placement.
- Click Add rule.
- On the storefront, right-click the header area, then click Inspect.
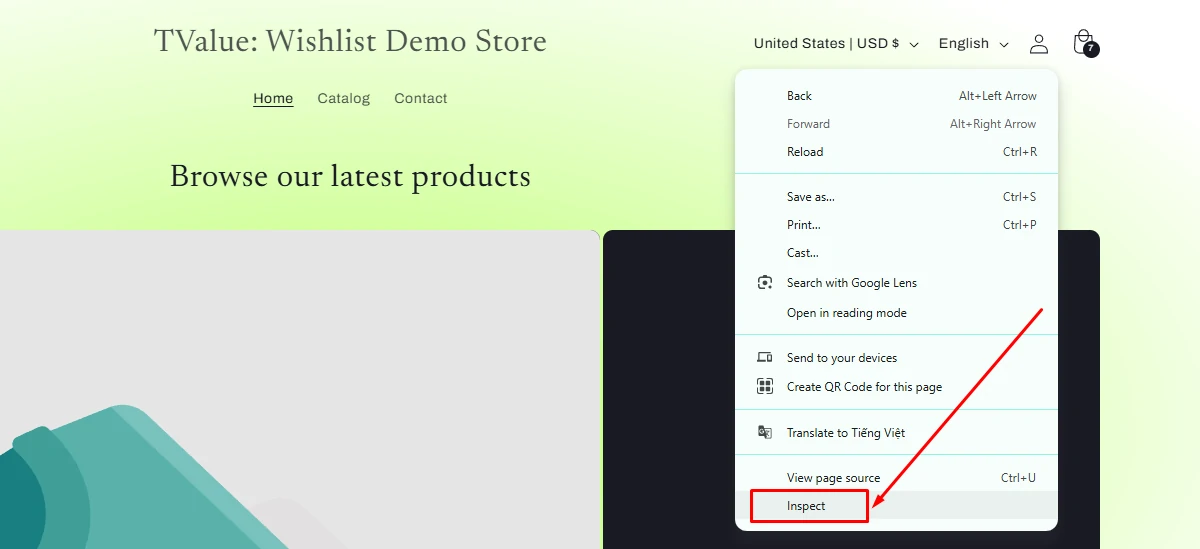
Inspect the header area where the wishlist button should be inserted.
- Find the Inject target selector.
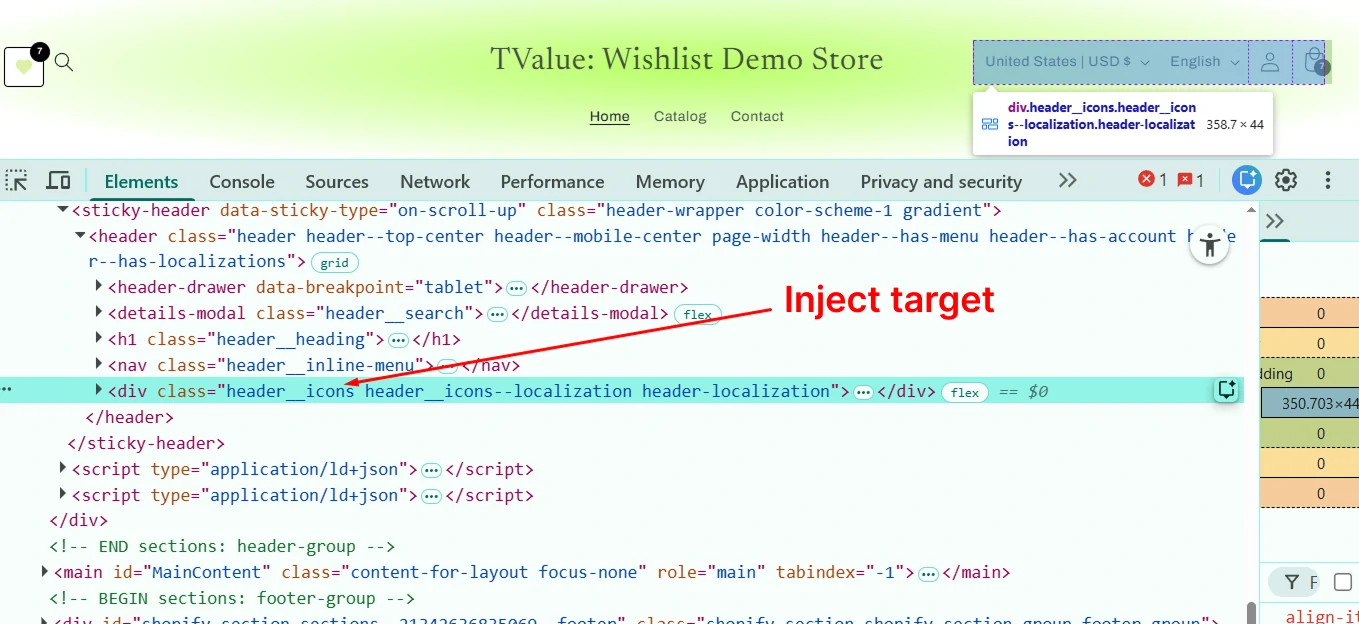
Header placement only needs the header inject target selector.
Example selector:
Inject target: .header__icons
- Choose an Icon injection position.
- Save and test the header on desktop and mobile.
Injection positions
For product listing and product page rules, static positions include:
- inside-first-child
- inside-last-child
- before
- after
Absolute positions include:
- Absolute top right
- Absolute top left
- Absolute bottom right
- Absolute bottom left
For header rules, icon injection positions include:
- child-index
- inside-first-child
- inside-last-child
- before
- after
Testing checklist
After saving a custom placement rule, test:
- Desktop and mobile storefront views
- A product that is not in the wishlist yet
- A product that is already in the wishlist
- Product cards with sold-out products or sale badges
- Theme sections that load dynamically
- Header layout on desktop and mobile if you placed a header button
If the placement is fragile or hard to maintain, contact us from the app so we can add theme support instead.